Kaleidoscope

In order to do the kaleidoscope effect in photoshop, I needed to use a JPEG file because a RAW file is too large and it would take a longtime to process and carry out the actions that I want to perform on the file.

Once the JPEG file is opened in photoshop, I cropped the image, getting rid of anything that I did not want to have in the final image.


Then I double clicked on the background layer in the layers palette.


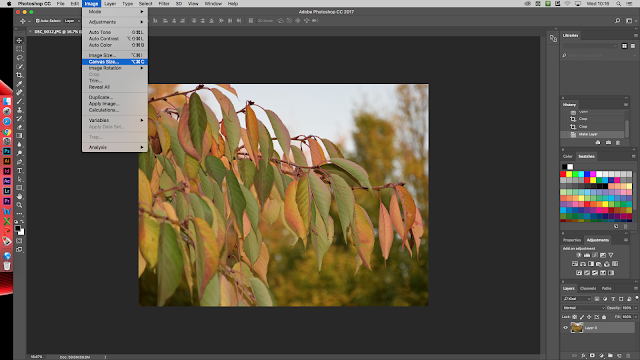
I then expanded the size of the canvas so that I could fit the kaleidoscope within the canvas. I achieved this by clicking on 'Image' and then 'Canvas Size'.


I then made the anchor so that it was top left of the canvas and I changed the units to percent and then I also set the width and height to 200%.


I then needed to copy and flip the top left layer so that it covers the remains empty areas of the canvas. I did this by selecting the top layer and then pressing 'cmd' and 'ctrl'-'J'. this copies the top left layer. I then renamed the new copied layer 'Top Right'.


I then went to 'Edit', 'Transform' and 'Flip Horizontal'


I then selected both of the top layers and presses 'cmd', 'ctrl'-'J'. This copied both layers. I renamed one 'Bottom Right' and the other 'Bottom Left'. Once that was done, I Flipped both of the bottom layer vertically by going to 'Edit', ' Transform' and then 'Flip Vertically'


Below is my first completed kaleidoscope image.


I also created another image, using the kaleidoscope effect. I Used the completed kaleidoscope image above to create the next one by using there same principles and instructions as to how I created the first image, the only thing that I changed was the 'Hue' (shown below)


Below is my second completed kaleidoscope image.


Comments

Popular posts from this blog

Stitching/Panorama

I created a stitched (photo merge) image by taking many photographs which overlap very slightly in order to produce a final panoramic image. I began by opening photoshop and going to the "File" menu and then "Automate" and then clicking on "Photomerge". By doing this, it opens up a tab which allows me to change what sort of photo merge I am going to produce and it also allows me to browse the files that I would like to use for the photo merge. I then browsed through my files to find the exact files that I wanted to use. Once I clicked open, it layered and merged the photos together into one final panoramic image. Once the final image was created I flattened the image by hovering over the "Layer" and then clicked on "Flatten Image" which brought all the layer into one. Below are my 2 final panoramic images that I created. The 2 final images above are underexposed so when I create a panoram...

Evaluation Of The Carousel (Week 1)

How to process black and white film: (BEFORE STARTING) Take the canister with the film rewound back into it from out of the camera.  Take a developing tank, scissors, film canister opener and the canister of film into a dark room. (IN DARKNESS) Once in complete darkness, open the canister, get rid of the film spool and cut the end of the film. once all that has been done load the film carefully onto the spiral. Then put the central tube through the middle of the spiral and then place it into the tank. Lastly, put the funnel on top of the tank making sure that it is on correctly. (PREPARING CHEMISTRY) Using water at 20 degrees, add one part water and one part X-Tol developer: one 35mm film =  300ml of a mixed solution so (150ml X-Tol + 150ml water = 300ml) so for two 35mm films, just double the mixed solution. (DEVELOPING) Pour mixed developer into the tan and put the lid back on. start a timer once the developer is in the tank. the time should be set for around 10 minu...

Health, Safety & Rules of The Darkroom

The health and safety of you and of others around you should be at the forefront of any photo graphical darkroom enthusiast. Below is a list of the key points that will prevent any minor or major incidents from occurring whilst working in the darkroom. Food and drink must not be eaten or drunk inside the darkroom. The extractor fan must be turned on whenever working with any chemicals in the darkroom. If you are using any chemicals, then either tongs or gloves must be used. If your skin comes into contact with any chemicals, then make sure that this is washed immediately. If there is spillage (may it be on worktops or on the floor), make sure to clear it up immediately to prevent anyone from slipping. Do not run inside the darkroom. Darkroom chemicals must not be consumed. Do not touch or interfere with anyone else's workstations or work at any time. When you have finished using the darkroom, make sure that your workstation is tidy with no objects left under enlargers ...